
Oh Christmas Tree – Free Crochet Pattern
As an Amazon Associate, I earn from qualifying purchases. When you purchase through links on my site, I may earn an affiliate commission. Here’s how it works.


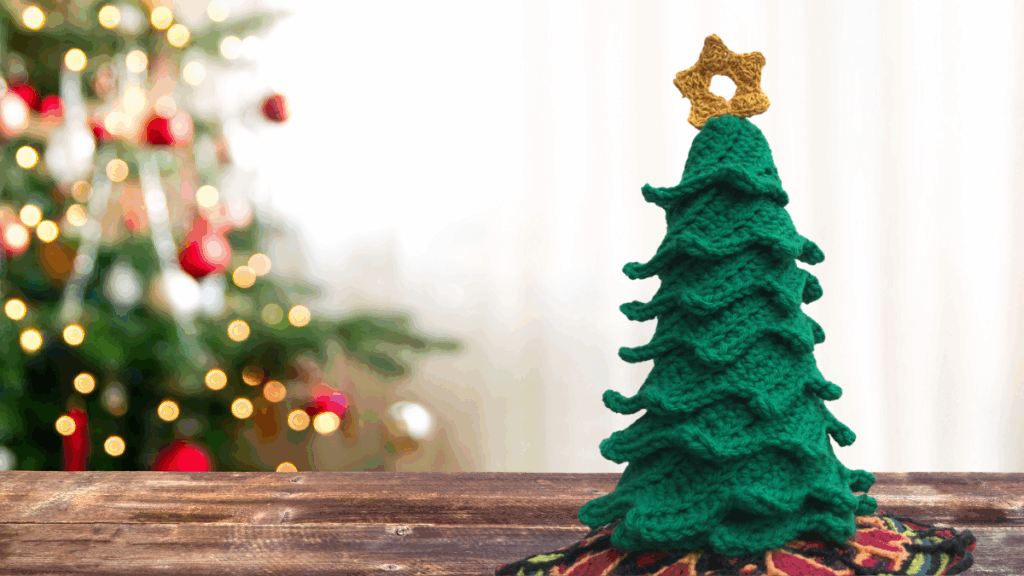
I designed this Crochet Christmas Tree pattern to give you a simple and fun holiday project. The tree is worked flat in rows and then wrapped around a cone shape. You can use a foam cone or roll cardstock into a cone to fit the size you want. This makes it easy to create trees in different heights.
This free pattern also includes a small crochet star. You can decorate your tree with lights, buttons, beads, or anything you have on hand. It’s an easy holiday decoration you can make quickly.

Yarn and Materials
Main Tree
- Yarn: Loops & Threads. Impeccable Solid. 4.5 oz (127.5 g) and 285 yds (260 m). 100% Acrylic. Medium Weight Yarn [4].
- Color: 1 skein Impeccable in Emerald (Color: 01200)
- Crochet Hook: 5 mm (H)
- Yardage: Tree: less than 268 yds (245 m)
Star
- Yellow waxed hemp cord or yellow Medium Weight Yarn [4]
- Hook: 3.25 mm (D)
- Tighter stitches will help the star hold its shape.
Extras
- Scissors
- Tapestry needle
- Hot glue (optional)
- Foam cone: 3 ⅞ in x 8 ⅞ in (98 mm x 225 mm)

Difficulty Level
- Easy
Finished Size
- Approximately 9 inches tall (not including star) when assembled.
Gauge
- Approximately 2 rows per inch and 4 stitches per inch.
You can substitute any yarn and hook for this stitch pattern – just remember when you substitute if your gauge is different, the finished size, and amount of yarn used for your project will also be different.
Abbreviations
Crochet Stitch Dictionary
US Terminology used
- ch – chain
- dc – double crochet
- g- grams
- hdc – half double crochet
- m – meters
- oz – ounces
- R – row
- rem – remaining
- sc – single crochet
- sk – skip
- sl st – slip stitch
- st/sts – stitch/stitches
- tr – treble crochet
- yds – yards
- * to **– Repeat the instructions between the asterisks the number of times indicated. This repeat will contain multiple instructions.
- [] – at the end of the row – the total number of stitches
- () – important notes AND sets of stitches to be worked within one stitch, or space
Helpful Tutorials
Notes:
- Add the Crochet Christmas Tree Pattern to your Ravelry Library here.
- This pattern is worked flat as a long strip. The strip naturally curls as you crochet, making it easy to wrap it around a cone to form the tree shape. You can secure it in place with a few stitches or small dabs of glue.
- The star is worked in small triangles that are joined together to form the final shape.

Easy Crochet Christmas Tree Pattern
This project is worked flat in rows before being assembled around a foam cone.
Using your 5 mm (H) crochet hook (or size required for gauge):
R1: Ch 11, sk the first ch. *2 hdc in the next ch, 1 hdc in the next ch**. Work from * to ** across, ch 1, turn. [15 hdc]
NOTE: For the remainder of this project you will be working in the back loop only for each stitch.
R2: 2 hdc in the first st, 1 hdc in each of the next 10 sts, leave rem sts unworked, ch 1, turn. [12 hdc]
R3: *2 hdc in the next st, 1 hdc in the next st**, work from * to ** across, ch 1, turn. [18 hdc]
R4: 2 hdc in the first st, 1 hdc in each of the next 10 sts, leave rem sts unworked, ch 1, turn. [12 hdc]
R5-R106: Rep R3 and R4
Finish off leaving a long tail for seaming the tree.

Tree Assembly
Start at the base of your cone. Wrap the strip around the cone, slightly overlapping the layers. Begin with Row 1 since it has the textured edge.
Thread a length of green yarn on a tapestry needle.
- Secure the top of the tree first
- Weave around the top to close the center
- Work down one side of the tree to hold it in position
- Secure your starting point at the base
- Weave in ends
Photo Tutorial

Step 1: Beginning at the base of the cone, wind the strip around the tree overlapping the layers slightly. I began with R1 – because it has the ‘funny edge’ bit 😉

Step 2: Once you have the tree in position on the cone take a length of green yarn and thread it on a yarn needle. Beginning at the top of the tree, secure the top of the tree into place and then weave the needle in and out of the stitches on the top circle.

Step 3: Tighten (like you would when you finish the fingertip section of a mitten) slowly to bring the edges together and close the hole at the top of the tree.
Step 4: Now weave the needle between the stitches on one edge of the tree to secure it in position; working downward to the base of the tree. Secure the starting spot (previously pinned together) and finish off, weaving in ends.

Crochet Star Pattern
This simple star is crocheted in rows.
Using your 3.25 mm (D) crochet hook (or size required for gauge) and leaving a 6 inch tail of yarn:
R1: Ch 5, sk the first ch, 1 sc in the next ch, 1 hdc in the next ch, 1 dc in the next ch, 1 tr in the next ch. *Ch 6, sk the first ch, 1 sc in the next ch, 1 hdc in the next ch, 1 dc in the next ch, 1 tr in the next ch**. Work from * to ** 9 times total. [10 triangles]

Now you have a long row of triangles on a chain.
Star Assembly
Step 1: Fold the length in half matching up the last triangle and the first triangle worked so the WS are touching and the RS (good sides) are facing outwards.

Step 2: Next you are going to crochet the bases of the triangles together. Work 4 sc along the base of each triangle through both layers. Once done, you will have 5 triangles in total.

Step 4: Next, crochet through both touching triangles to join them together along the edges. *Work 3 sc along the side edge, ch 2, work 3 sc along the side edge. Skip all the other stitches.** Work from * to ** across. Sl st to the corner.

Step 5: Bring the 2 ends together and sl st them to form the shape of a star. It will not be completely flat but this waxed fiber stretches out after a while so feel free to work it into the shape you want with your fingers. Finish off leaving a 5-6 inch tail.
How To Attach the Star
How I stuck the star on – you can do it any way you want – glue or a toothpick – I chose to just stitch it right on there with the waxed fiber.
First I popped the ends through the top closed center of the tree and then out the back between 2 stitches. I wove one end up one side of the star and the other end up the other side of the star and tied them together in a double knot and cut off the excess. You can barely see it and it worked like a charm!


Decoration Ideas
- Tiny lights
- Mini pom-poms
- Buttons
- Beads
- A star in a contrasting color
- A matching set of trees in different sizes
How to Print or Save This Pattern
Tip: Click the printer icon at the top of this post to print or save a copy of the pattern for your personal use. You can choose to save it as a PDF or print it out to keep beside you while you crochet.
Crocheters Often Ask
Yes, Medium Weight Yarn [4] works well. Size may vary slightly.
No. A cardstock cone is a good low-cost option.
Use a taller or shorter cone.
Yes. Use a smaller hook, cotton yarn, or lightly stiffen it.
Share Your Creations
Finished a Crochet Christmas Tree? Share your photo and a short message here,
or you can also create a Ravelry project page.
#crochet #Christmas #ChristmasTree #crochetstar #freepattern

You May Also Like These Patterns
This Crochet Christmas Tree is a quick project that adds a handmade touch to your holiday decorating. Try making a few in different heights or colors to create a cozy display.
Happy crocheting!

Join the Oombawka Design Crochet Facebook Group!
Share your project photos, ask questions, and connect with other crocheters using Oombawka Design Crochet patterns and tutorials. We’d love to see your progress and finished makes! Join us here.
Connect with Me
Follow me on Facebook, Pinterest, and Instagram for the latest updates.
Love Furls Crochet?
Use my discount code OOMBAWKA2025 to receive 15% off the Furls Crochet Collection. Limit 1 use per customer. Expires December 31, 2025.
Love Shady Lane Original Crochet Designs?
Use code OOMB for 15% off any pattern on the Shady Lane website, or code OOMBAWKA in her Etsy Shop. Expires December 31, 2026.

Hi Miram, I used waxed bracelet cord but in the instructions I indicate you can use Medium Weight Yarn (the same as the tree) instead in the color yellow with the smaller hook size indicated for the star pattern. I didn’t have yellow yarn so I substituted the cord for the photos and added notes to the instructions so you can do the star in yarn instead. Hope this helps! Rhondda
Rhondda,
I don’t see any information on what yarn to use when making the star. In the instructions it says something about it being ‘waxed’ but I have no idea what this refers to. Would you please clarify? Thank you!
Hi Miram, You are absolutely right! I am very sorry. It should read Row 5-Row 106: repeat Row 3 and Row 4. I’ve updated this pattern and am off to update the PDF too. Thank you for letting me know so I could fix this! Rhondda
I just have an observation that maybe you can help clarify.
In the photo of the finished spiral there are 53 end points and each point consists of 2 rows of crochet.
If I only repeat rows 3 and 4 to row 55 then that only equals 27 or 28 points for the tree edges.
Am I missing something or do we need to do more of the repeats than listed?
Hi Patience, Options would be to make the length of the stitch pattern longer OR use a heavier weight yarn (and larger hook). I think I would start by trying using a bulkier weight yarn as it will make all bits of the project bigger rather than just the length; for a more fuller tree.
Hopefully, you’re still checking these comment boards! Because I have a question for you. What if I wanted to use a larger and wider cone. How would I go about increasing?
Currently making this very easy pattern. Thank you so much for sharing it. Am hoping to get a few done in different sizes/colours for presents.
(So glad I figured out American crochet terms )
Wishing you a happy and peaceful Christmas from Sydney.
Hi Sara 🙂 Yes it is a spiral and it does make a lovely scarf too 🙂 Perhaps not in bright green 😉 but it will do well in a super bulky yarn! Easy makes me happy 🙂 All the best, Rhondda
Very welcome Mel! I’m so happy you like it 🙂 Have a lovely Christmas! Rhondda
I saw this on G+. I guessed that it might be one piece in a spiral and it looks like I am right.
So clever. After you use for the holiday’s just wrap it around your neck for a scarf.
It’s a beautiful little tree! We’re in a little space and it’s going to be perfect for this Christmas! Thanks for the pattern!
Hi Edith! The mat is one I completed in a Mandala Crochet-a-long and it is for sale by my favorite mandala designer 🙂 Here’s the link: I adore her designs – all of them 🙂 I’m happy you like the tree! All the best, Rhondda
Love the tree, simple yet practical, just what I need. Any chance of the little mat it’s sitting on as a freebie as well ??????? please ?????????.
I know I sound greedy, but I love the colours of it, and it looks just right for the tree.
If not a freebie, can you show me where to get it from ?
Thanks,
Edith
from “Down Under”