As an Amazon Associate, I earn from qualifying purchases. When you purchase through links on my site, I may earn an affiliate commission. Here’s how it works.
For the updated versions for all other sizes please visit my Craftsy Shop!
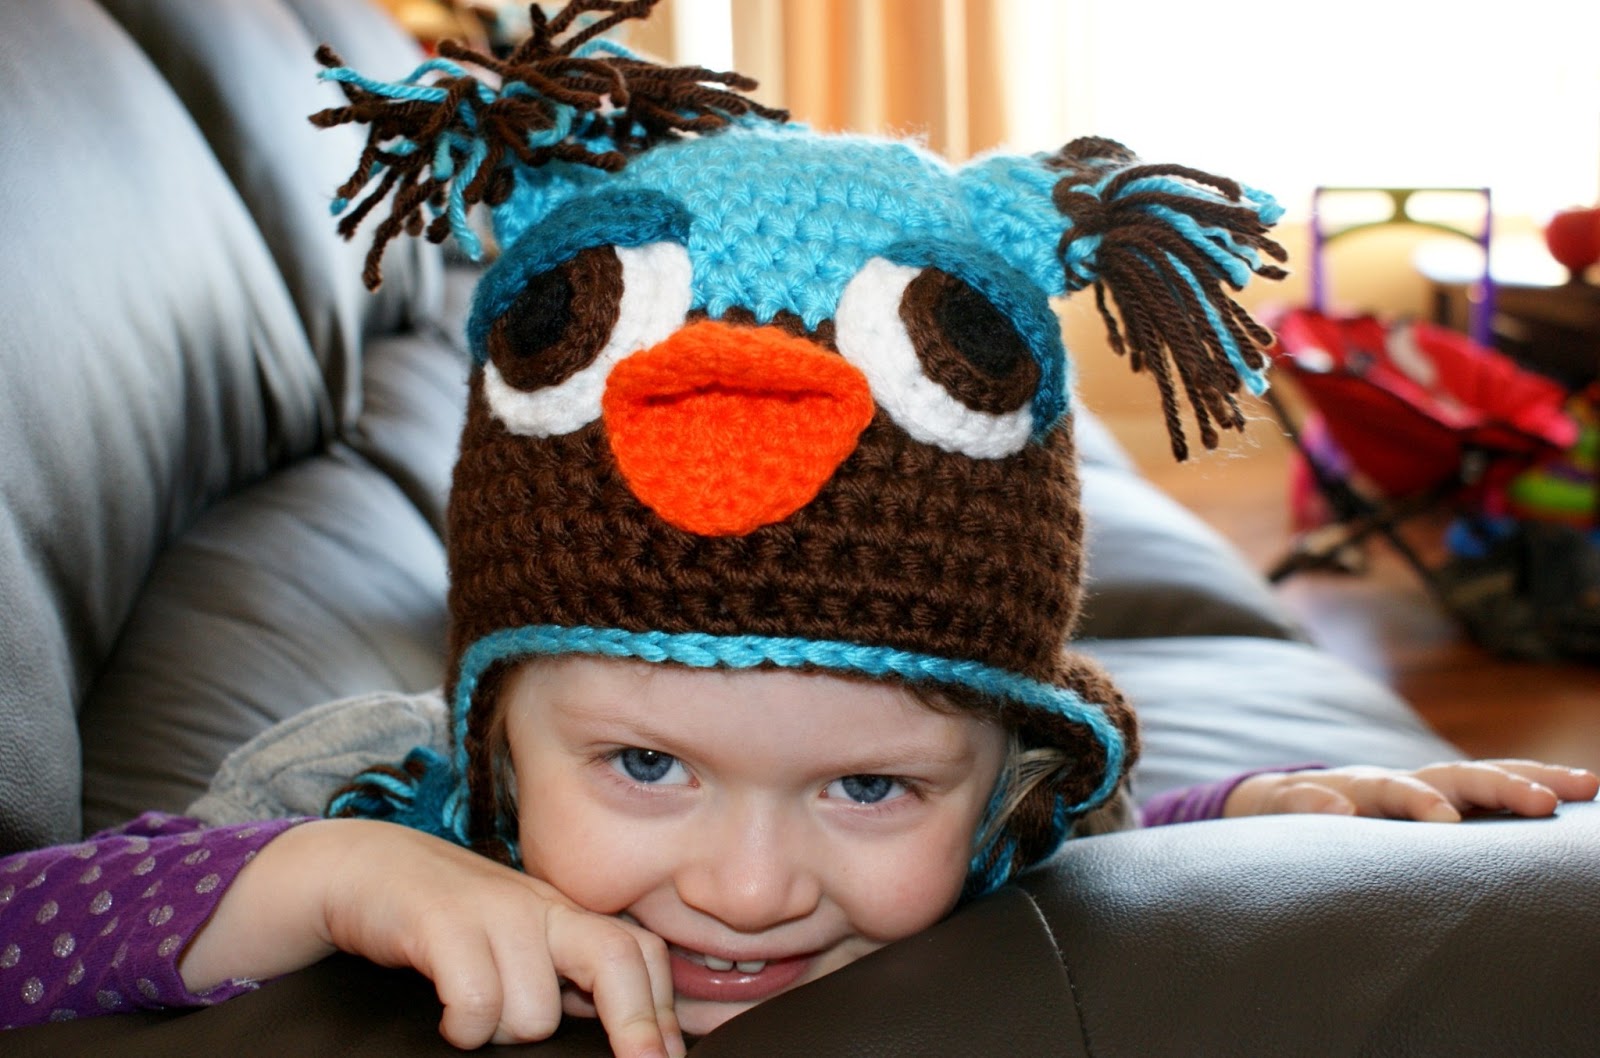
For the original Not Another Owl Hat Pattern version please see the post below:
Please feel free to sell items you make using my patterns. I only ask that you credit me with the original design and if possible provide a link to my site.
Hooks: Size 6.50 mm (U.S. K/10.5) and 5.0 mm (U.S. H/8) (or size needed to obtain correct tension)
Materials: (the hat is crocheted using two strands of Red Heart Soft Yarn)
Red Heart Soft Yarn [4] – Medium (5oz/141g) (256y/234m) Colours: Turquoise [MC] (main hat and ties), Chocolate [CC] (main hat, eyes and ties) and Teal (eyelid and ties)
Red Heart Supersaver Yarn [4] – Medium (7oz/198g) (approx. 364y/333m) Colours: black (eyes), white (eyes)
Round 3: (1 hdc in first st, 2 hdc in next st) 8x [24]
Round 4: (1 hdc in first 2 sts, 2 hdc in next st) 8x [32]
Round 5: (1 hdc in first 3 sts 2 hdc in next st) 8x [40]
Round 6: (1 hdc in first 4 sts, 2 hdc in next st) 8x [48]
Round 7: 1 hdc in each st around [48]
Round 8: 1 hdc in each st around [48]
Round 9: 1 hdc in the first 45 sts, 1 sc in each of the next 2 sts, 1 ss in last st, FO, weave in ends [48]
Round 10: *Using 2-strands CC* 1 hdc in each st around [48]
Rounds 11-17: 1 hdc in each st around [48]
(do not finish off!)
Earflaps (this is a continuation of the hat but worked in rows)
Rows 1-3: 1 hdc in each of the next 8 sts, ch 1, turn [8]
Row 4: hdc2tog, 1 hdc in each of the next 4 sts, hdc2tog, ch 1, turn [6]
Row 5: hdc2tog, 1 hdc in each of the next 2 sts, hdc2tog, ch1, turn [4]
Row 6: hdc2tog, ch 2, hdc2tog, FO [4]
Keeping the top of the hat facing you, count left 13 sts from the earflap (where it attaches to the hat). Attach your yarn to the 13 st, and beginning in the next st (14th stitch):
Rows 1-3: 1 hdc in each of the next 8 sts, ch 1, turn [8]
Row 4: hdc2tog, 1 hdc in each of the next 4 sts, hdc2tog, ch 1, turn [6]
Row 5: hdc2tog, 1 hdc in each of the next 2 sts, hdc2tog, ch1, turn [4]
Row 6: hdc2tog, ch 2, hdc2tog, ch 1, turn [4]
You will now be working around the hat.
Finishing
Round 1: sc in each stitch around the hat **except at the bottom of each earflap**. In the chain 2 space created at the base of each of the earflaps, hdc three times. If you wish to add a contrasting colour , please FO CC at the end of Round 1 and add the new colour (MC was used on the hat in the photo) to begin round 2.
Round 2: ss in each st around the hat, FO, weave in ends
Horns/Ears: (using 2-strands of MC) and a 6.50 mm hook
make 2
Row 1: chain 15, turn [15]
Row 2: in the 2nd ch from the hook, 1 hdc in each blo across, ch 1, turn [14]
FOLD the strip in half and working through both pieces
The “tassels” that are threaded through the 4-spaces at the end of the horns are made-up of 8-strands of yarn (each tassel) and each strand is 6-inches long. For each horn you will need 32-strands. They are threaded through in the same manner as the ties are threaded through the chain-2 spaces at the end of the earflaps. Please see the ties section for detailed instructions.
Beak: (using 2-strands of Patons Astra) and a 5.00 mm hook
Round 1: create an AL, hdc 12x into the loop, ch 2
Round 2: (2 dc, ch 1, 2 dc) in the next st, 1 sc in each of the next 5 sts, ch 2, (2 dc, ch 1, 2 dc) in the next st, 1 sc in each of the next 5 sts
The shape will now resemble a diamond.
Round 3: Before starting this round please read the step completely. 1 sc in each stitch around except for the top and bottom of the diamond (the 12 and 6 position if you think of it as a clock shape). Crochet 3 sc in both the top and bottom stitches.
Round 4: ss around, FO and weave in ends
Fold in half (the seam will be at the 3 and 9 positions if we are thinking of it as a clock).
Eyes (using 1-strand of Red Heart white) and a 5.00 mm hook
make 2
Round 1: create an AL, hdc 6x into the loop, ss to the 1st hdc to join [6]
Round 2: 2 hdc in each st around, ss to 1st hdc of round to join [12]
Round 3: ch 2, (1 dc in first st, 2 dc in next st) 6x, ss to join[18]
Round 4: (1 sc in the first 2 sts, 2 sc in the next st) 6x, ss to join [24]
Round 5: ss around, FO, weave in ends [24]
Iris (using 1-strand of Red Heart Soft chocolate) and a 5.00 mm hook
make 2
Round 1: create an AL, sc 6x into the loop [6]
Round 2: 2 hdc in each st around [12]
Round 3: (1 sc in the first st, 2 sc in the next st) 6x [18]
Round 4: ss around, FO, weave in ends [18]
Pupil: (using 1-strand of Red Heart black) and 5.00 mm hook
make 2
Round 1: create an AL, sc 6x into the loop [6]
Round 2: ss in each st around, FO, weave in ends [6]
Eyelid: (using 1-strand of Red Heart Soft Teal) and 5.00 mm hook
Row 1: ch 10 [10]
Row 2: starting in the 2nd ch from the hook, 1 sc in each st across, ch 1, turn [9]
Row 3: 1 sc in each st across, ch 1, turn [9]
Row 4: sc2tog, 1 sc in each of the next 5 sts, sc2tog, ch1, turn [7]
Row 5: 1 sc in each st across, ch 1, turn [7]
Row 6: sc2tog, 1 sc in each of the next 3 sts, sc2tog, ch 1, turn [5]
Row 7: sc2tog, 1 sc in the next st, sc2tog [3]
Round 8: sc around the entire piece, FO, weave in ends
Ties: (using 36-strands of Red Heart Soft yarn in 3-colours, each strand is 60-cm long)
make 2 bunches
To measure my strands I have a piece of precut cardboard (30-cm) and I wrap the yarn around this cardboard, cutting only the bottom edge (each full wrap totals 60-cm).
I take my pile of 36-strands and loop the middle of the pile around my finger (or a crochet hook) and hold the loose ends with my other hand. I feed the centre (the portion looped on my finger) through the earflap-end (chain 2 space at the end of the earflap) from the outside of the hat, toward the inside.
I pull the loop far enough through that I can feed the loose ends through the centre of the loop. I tighten these strands slowly.
Then I divided the strands into 3-piles of 12 and braid the yarn. Once I am near the end, I tie the ends of the yarn in a lose knot around the braid and slide the knot toward the bottom of the braid. Once it is where I want it to be I tighten it by pulling firmly. If you have any stragglers you can pull each strand until you find the ‘right’ one to make it align with the rest, or undo the knot and try again.
Assembly:
When stitching the pieces together I stitch between the posts of sc round and the final ss round (it tends to hide the stitches within the work).
Before stitching them to the hat, I count stitches from the middle of the hat to try to ensure that they are evenly placed. You can use bits of yarn to mark placement (or safety pins).
Have fun! Feel free to contact me if you need assistance.
Happy crocheting!
Join the Oombawka Design Crochet Facebook Group! Share your project photos, ask questions, and connect with other crocheters using Oombawka Design Crochet patterns and tutorials. We’d love to see your progress and finished makes! Join us here.
Curated Crochet Essentials Visit my Amazon shop for a handpicked selection of crochet tools, books, and kits.
Love Shady Lane Original Crochet Designs? Use code OOMB for 15% off any pattern on the Shady Lane website, or code OOMBAWKAin her Etsy Shop. Expires December 31, 2026.
Rhondda Mol is the crochet designer and blogger behind Oombawka Design Crochet. Since 2012, she has been sharing free crochet patterns, tutorials, and expert tips to help crocheters of all levels succeed. With more than 600 published patterns, Rhondda focuses on creating clear instructions and resources to inspire creativity and confidence in the crochet community.
There is a link available on the site too – up on the top menu bar beneath my logo – it should read “Pattern Shops” and then Craftsy should be one of the one’s that pops up under the drop-down menu bar 🙂
Have a lovely day,
Rhondda
How do I find your Craftsy page?
Very welcome! I’m so happy you like the Owl Hat pattern!
I know just the person this is perfect for, ty for pattern !
Thank you Karen 🙂
Yours is my favorites of all owl hats. They EYES are way too cute! I have this in my queue to make, thanks 🙂
Thank you Stephanie 🙂 It is one of my favourites too!


Hi Lisa,
Here’s the direct link:
https://www.craftsy.com/
There is a link available on the site too – up on the top menu bar beneath my logo – it should read “Pattern Shops” and then Craftsy should be one of the one’s that pops up under the drop-down menu bar 🙂
Have a lovely day,
Rhondda
How do I find your Craftsy page?
Very welcome! I’m so happy you like the Owl Hat pattern!
I know just the person this is perfect for, ty for pattern !
Thank you Karen 🙂
Yours is my favorites of all owl hats. They EYES are way too cute! I have this in my queue to make, thanks 🙂
Thank you Stephanie 🙂 It is one of my favourites too!
Thank you Melissa 🙂
Love this pattern as I love Owls!